
I have a book on Needlecraft from 1959 and flipping through it’s pages this winter I was reminded how little Americans sew now-a-days. It used to be clothing was made at home, toys were created from little more than trash, and décor like curtains and rugs created from scratch.
Believe me, I’m not complaining. I do not want to spend my time fixing holes in clothing or darning socks. But I am a sucker for a fun DIY and this one had me stitching on a cold Sunday afternoon.
While I don’t profess to be an excellent sewer I have been in and out of it since I learned to make friendship bracelets as a little girl. So check out this Pinterest board to get your mind filled with ideas and check out my 3D flower which allows you to practice the basics of 3D embroidery. I’m using two types of stitch, a seed stitch and a blanket stitch.
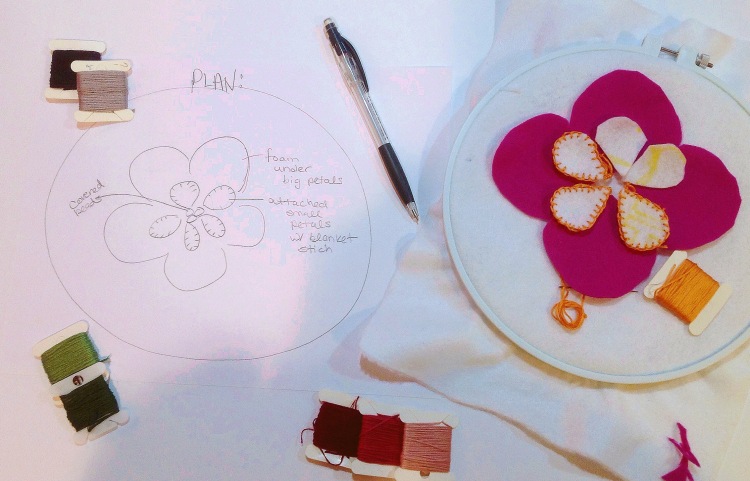
TIP: Make a plan ahead of time, mine changed several times, draw it on your fabric so you know it’ll fit.
Other than a plan you will need:
- Base fabric- cross stitch fabric is great I happened to use felt. As long as it’s firm and won’t pull through or tear with pressure. Be creative!
- Extra fabric- I’m using a fun pink felt but you can simply use more of your base fabric if you want to cover it up with stitching.
- 3-5 Seed Beads– the cheep plastic ones with the big hole. Color doesn’t matter we will cover them later.
- Embroidery Needle- different from regular needles these are a bit blunt so you don’t go poking yourself and getting blood on your fabric.
- DMC Floss (Embroidery String)- this comes in a little bundle for about .50 cents per color and has 5 strands to it. You can use one strand a time for a delicate look or all five for bold strong lines.
- Scissors- or the pocket knife your hubby left on the table.
- 1/2″ Flat Foam- used to give the raised 3D effect.
- Embroidery Hoop- You can do this without the hoop but I’m telling you it’s so much easier with it. The size of my project is dictated by the size of my hoop in this case.
- Frame- You could use the hoop as the frame, pretty common, or take the glass out of a different frame you have. It’s up to you and your project.
- Optional Wire and Snips– Used to create sharp lines and 3D pieces for more advanced projects. I’m passing on these for this project.
- Time- Depending on your plan this can take a couple hours or a couple months. I have an over zealous project that’s been in the works for three years.
TIP: Write down the numbers and brand of string you buy so if you run out you can find the exact match again if you need it.
For the base petals I cut out four matching petals and foam to go under them. Using a regular stitch (in/out) nothing fancy I attached the petals to the white background felt. I had to apply some pressure to the foam to get it to lay tight. I used a different colored string to do this but you could easily match the colors making your stiches nearly invisible.


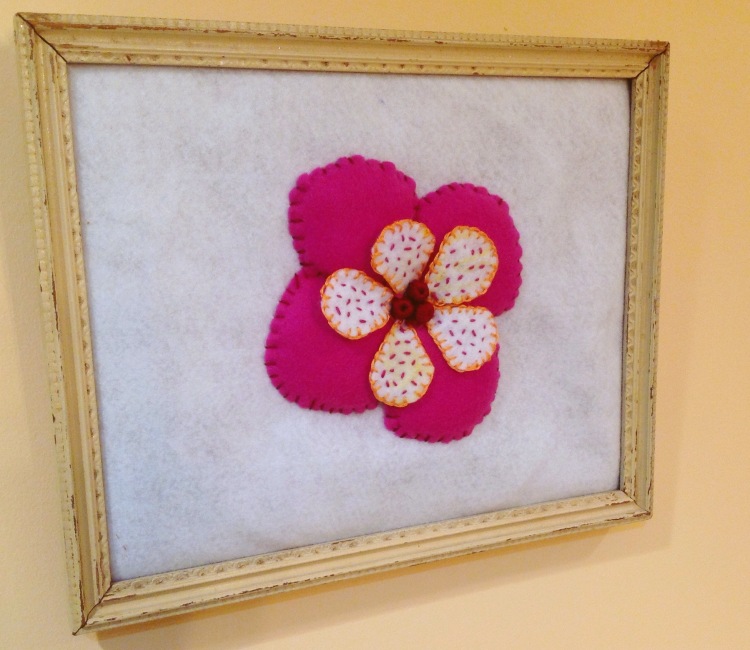
I used some extra white felt to cut out 5 small petals. These I blanket stitched the edges of and added small dots to the inside for texture. For the center I took each bead, knotted the string to it and started looping it around with my needle until covered.


After finishing each component I hooked them all together to make the final flower. I had a vintage frame which the glass had broken out of a few years ago and this piece fits perfectly.
I hope you enjoyed this project, maybe it’ll inspire you to get crafty with your sewing kit in the future.
Happy Questing!


Your so creative!!
LikeLike