
For all my lettering friends out there, I made a list of tools I use for hand lettering. I called it a guide because I think there are a lot of good products out there and a lot of different brands that work great. These tools are not “magic” and will not make your lettering look great automatically. They do however have what you need to make a great lettering piece.
“These tools are not “magic” and will not make your lettering look great automatically.”
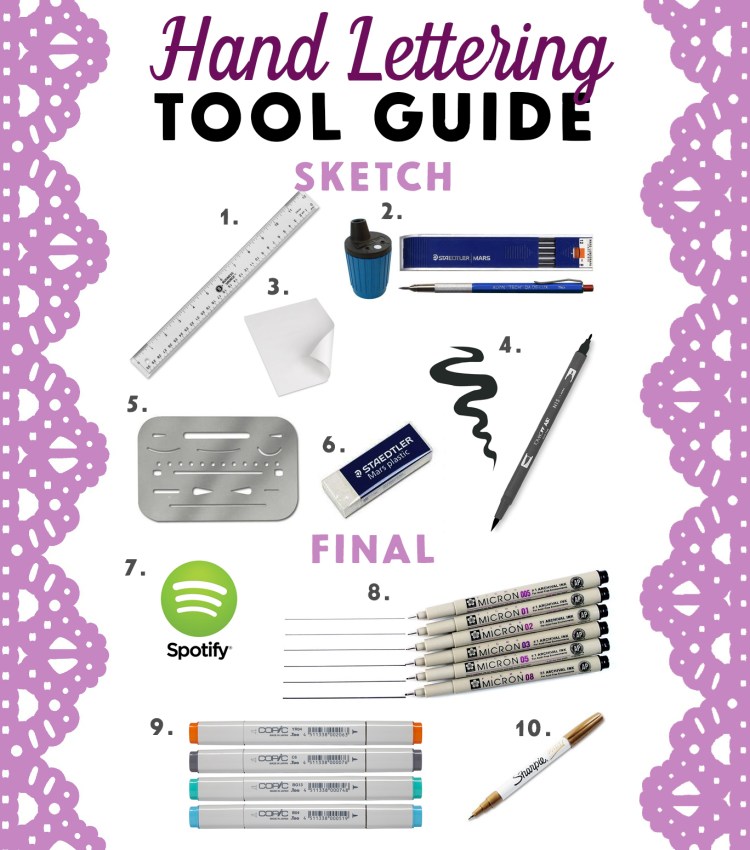
I broke the guide into two sections, sketch and final. The sketch section shows what I typically use to get my initial idea down on paper, and then what I use to refine it and get it ready to be the final piece. The Final section is items that I only use to make the final product. I am going to go through the list one by one and tell you how I use each item.
- Ruler, I hate measuring, but you have to measure to make your lettering good. Everything has to be spaced correctly, and its really hard to do that without a ruler. I also use this as a straight edge.
- This is a lead holder with lead and a sharpener. I like using this because you can keep a really sharp point on it, and its really good for refining as well as initial sketching. You can use a normal pencil as well, you really just need something to sketch with that can erase well later.
- Paper, I usually use a couple sheets because if I’m lettering a quote I like to sketch out as many different layout ideas first. When I pick one I like I will use another piece of paper. I use just regular copy paper for this, its cheap and I go through it really quickly. There really isn’t a reason to use more expensive paper on this unless you want that as part of your final look. It can give your lines a different effect because the paper will not be as smooth or will be really smooth, depending on the type of paper.
- I like using a brush pen to just write out my quotes to figure out the layout. You can also use brush pens in your final if you are going for that style.
- I use an eraser guard when I am refining my work and trying to get the sketch perfect and ready to do the final lettering.
- You need a good eraser, I use a white eraser because it doesn’t leave any marks on my paper. You could also use a kneaded eraser, which would work really well with the eraser guard.
- Music is a must when you start your final, I generally will do the outlines first of all the letters and then I just fill everything in. Good music will make the filling in step more enjoyable.
- I generally always use micron pens to do my final, they work really well and are precise and do not bleed.
- If you want to add color to your lettering I would suggest Copic markers because they are blendable and they work really well with the micron pens.
- Another fun way to add something unique to your piece is by using a metallic pen to give a different effect.
I hope this list helps you with your lettering and if you have anything not on the list that you think should be added let me know! I would love to hear what you use!
Discover more from Holy Homesteading
Subscribe to get the latest posts sent to your email.

