Sometimes life throws things at us in unexpected ways and timing. This is how we found ourselves one early Fall day, with a project on a grand scale. Placed in our hands was a house on 2 acres that needed some tender loving care and a desperate make-over inside and out. It had been deserted and left for dead. The yard overgrown and filled with debris that had been ripped from the very heart of this home and thrown haphazard outside it’s doors. We are not newbies to home restoration, so taking on this house was something we knew we could handle.
A small piece of earth to call our own.


What we are about to show you is one little glimpse into how to take a small piece of earth and make a harvestable garden in less than 6 months. Three of those months consisted of a Michigan winter.
Decide where you want the garden. We wanted a kitchen garden so having the garden in close proximity to our kitchen was important. Below are the pictures of the spot we chose, just as it was when we started this project. Make sure the spot you choose has enough sun exposure to allow for good growth. We discovered under all these weeds and debris a concrete strangely shaped sidewalk from a previous era. It would of taken a lot of man hours and hard work to remove it. So we incorporated it into our design.


")


Remove the rocks and debris from the area. Mow off the weeds. We used a brush-hog and a tractor. Cut the grass off high to start and recheck for more rocks and debris before using a lawn mower to cut everything off as short as possible. In these pictures we are working on multiple projects at once which is typical for us. Another reason we wanted a low maintenance “no-till” layered garden.


Begin by overlapping cardboard, newspaper or unwanted mail over every inch you want to use for your garden. Cover all earth and leave no cracks for sunshine to get through. We even used scrap drywall from our inside project. This was locally Michigan made gypsum board. Powdered gypsum is often used to correct compacted soil or soil with large amounts of clay. We didn’t use anything that could not easily compost down. Remember no pre-weeding is needed. Just place it over top of the weeds or grass. Do not till up the soil.


On top of this layer add more layers of lawn clippings, leaves, compost, manure, straw, hay, wood chips, sawdust or whatever you have available. Since this property had not been cared for in years we had a lot of organic material, leaves and dead grass. Water it down as you add the layers.


Once the snow melted and the temperatures warmed up we planted directly into these prepared beds. We added purchased potting soil right where we sowed the seeds or plants. We also found an old uninstalled fence on the property and we incorporated that into our design along with some old pavers that we used for the circle motif in the middle.


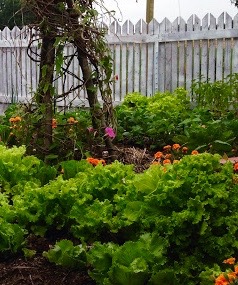
Six months after we mowed the property for the first time, we harvested lettuces, snow peas and radishes. As the summer progressed we continued to have a bountiful harvest. There was little to no weeding and except for the initial watering, very little added water was needed. The garden is completely organic with no commercial fertilizers. Some of the things we planted were tomatoes, peppers, onions, chives, snow peas, green beans, all the herbs, lettuces, strawberries, edible flowers, carrots and kale.
We had plenty of produce for our family and enough to give away too!
We are very happy with how the garden produced for us the first year. The quality and depth of the forming soil is unbelievable. We hope this article inspires you this spring to find a small piece of earth to call your own and start taking responsibility for producing some of the foods you eat everyday. Stayed tuned for growing season two!
Discover more from Holy Homesteading
Subscribe to get the latest posts sent to your email.


3 thoughts on “No-till Layered Kitchen Garden”