Are you a hot or cold coffee person? Does it depend on the season, or are you strictly one or the other?
Either way, I have a money-saving solution for you: cold brew coffee.
Why cold brew?
- You don’t need a fancy machine.
- You don’t need expensive coffee.
- You don’t need mad barista skills.
- You can enjoy it hot or cold, black or creamy.
What is cold brew?
There are two types of brewing: hot and cold. Most coffee brewing happens with heat. The water is heated in some fashion before it is poured over the coffee grounds. This process takes just a few minutes for a large pot of coffee. This is efficient, but the coffee can be bitter and more acidic, requiring more cream and sugar for people like me.
But cold brew coffee is different. Coffee grounds steep in room temperature or cold water for at least 24 hours. This process takes zero effort from the coffee brewer, but it does take preparation and time. The result is a less acidic, smooth cup of coffee requiring less cream and sugar.
The difference in acidity (and wanting to lower my cream and sugar intake) is the reason why I took an interest in cold brew coffee. But the reason I continue using this method is because it actually saves me money.
How do you make cold brew?
Have you ever made sun tea? It’s kind of like that, but not in the sun.
Once upon a time I received a fancy cold brew coffee maker as a bridal shower gift. I loved it. Until I managed to break the glass. I held onto the pricey plastic filter for a few months before I decided that it wasn’t worth buying another carafe. (I am clumsy, after all.) So I needed a cheaper solution that could be easily replaced if I happened to break more glass. The crazy thing? I found a way cheaper solution that has lasted me a few months longer than the fancy cold brew coffee maker did.
You don’t need anything fancy. You just need five things:
- Mason jar, any size
- Coffee grounds, any flavor
- Nut milk bag (I bought these.)
- Water
- Time
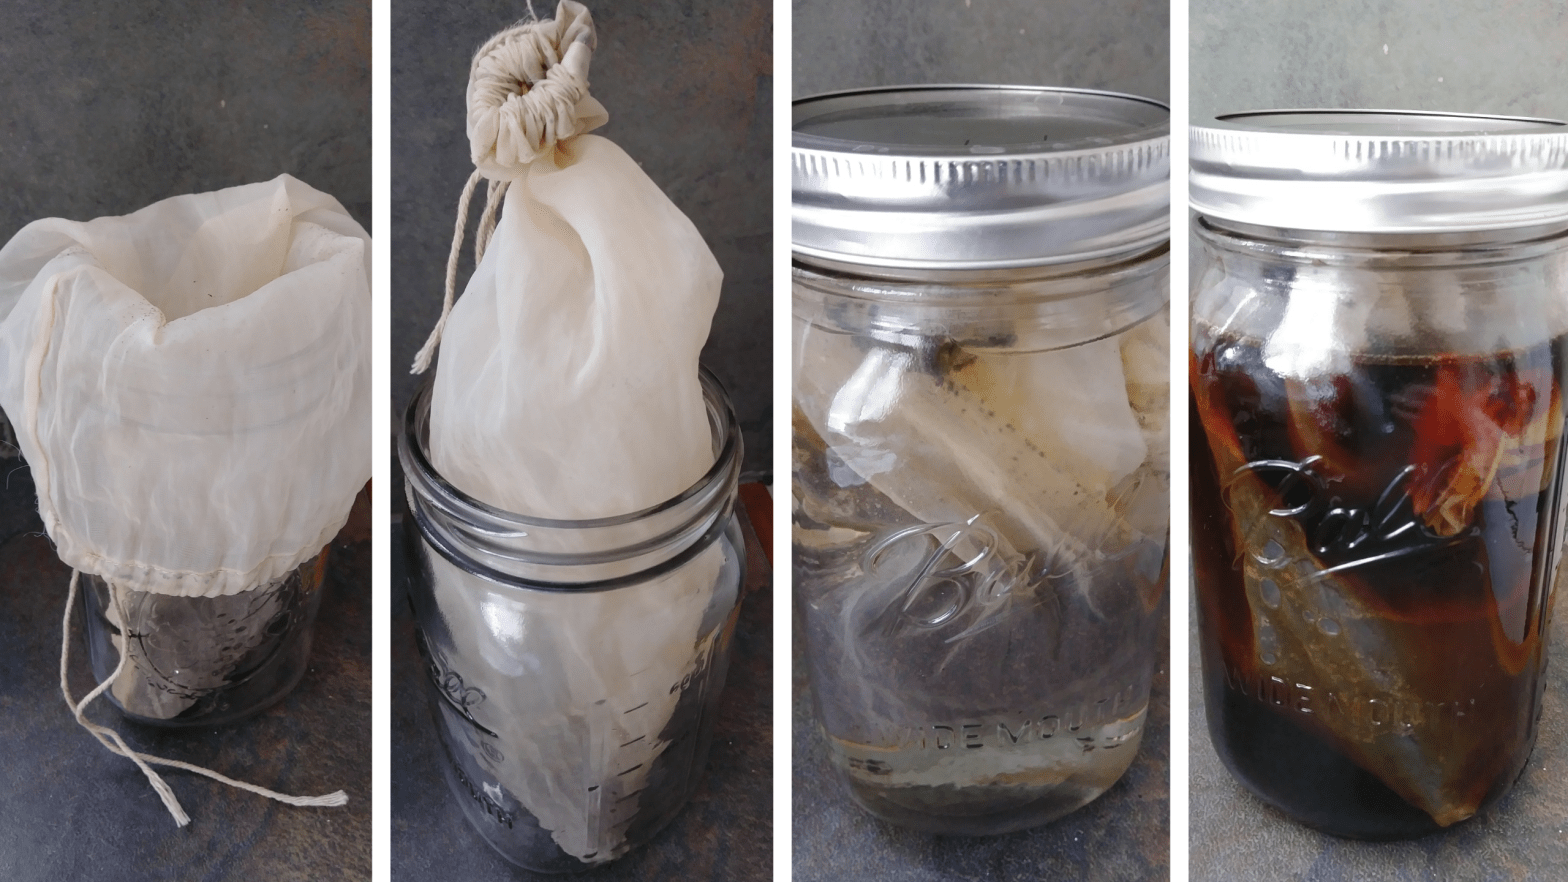
Personally, I use a 32 oz. mason jar and 3/4 cup coffee grounds with each batch of cold brew coffee. (Lately, I’ve been mixing 1/2 cup vanilla light roast with a plain medium roast for a lightly vanilla but robust flavor.) I place my nut milk bag in the jar and open up the bag over the sides of the jar to pour the coffee grounds in the bag. Then I tie off the bag twice to be sure no grounds escape. I fill the jar with water and secure the cap on the jar. Lastly, I keep the jar in the fridge for about 24 hours. (This isn’t rocket science. Sometimes I make cold brew coffee before bed and it first steeps for about eight hours. That first cup won’t be as robust as the rest, but it’s better than no coffee.) Within seconds you’ll see the coffee grounds steeping and the water slowly turning into coffee.
Some people keep their cold brew coffee steeping on the counter, but I don’t have a lot of counter space, so I keep mine in the fridge. Plus, I like the option of cold coffee if I want it in the morning. That’s the best part. The next day, I have coffee ready to enjoy cold. Or I can quickly warm a cup up in the microwave to enjoy it hot. Whether I want my coffee cold or hot, it’s already brewed and ready to drink.
What does it cost?
Let’s break this down: 32 oz. mason jars cost about $5 each, but usually come in pairs or larger sets. If you purchase two mason jars at $11 and three nut milk bags at $7, you can make two batches (simultaneously or alternately) of cold brew coffee (plus the cost of coffee grounds and water, if applicable) for $18, and have a spare nut milk bag for other projects, like making nut milk. The best thing about this system? Each item (except water and time) are reusable! Please show me a cold brew coffee system that’s cheaper than $18, including the filters. (Although there are mason jars with filters being sold as cold brew coffee systems… Just make your own.)
When I did have my fancy cold brew coffee maker (that cost $26), the glass broke because I pushed the plastic filter too close to it. A nut milk bag will not do you wrong like that. Priceless!
The secret to cold brew
Another reason to brew coffee cold is to save money. When you brew coffee hot, you toss the grounds after one use, right? The grounds are used up and really not reusable if you want even remotely strong coffee. Maybe you have a compost pile or you just toss them in the trash, sad that your coffee supplies are dwindling. (This can’t just be me…) But cold brew is different.
Cold brewing doesn’t just make a cup of coffee. It makes a coffee concentrate.
That’s right. You don’t fill your cup up with concentrate. Those 32 oz. go farther! This is why, as you steep coffee grounds, it looks like sediment fills the bottom of the jar. This is the good stuff! (Kind of like apple cider vinegar.) Before you pour a cup of coffee (half cup of concentrate), shake up your mason jar! This will help ensure you have strong coffee all week long. Depending on your taste preferences, you can actually enjoy one 32 oz. mason jar of cold brew coffee for a week. How? Two things:
1. I use half cold brew, half water (plus a dash of heavy cream and a spoonful of maple syrup) for one cup of coffee.
Choose your mug, big or small, and start with half a cup of cold brew concentrate. I have found this as my sweet spot for a great cup of coffee, but you might want more or less concentrate in your cup. This means that 32 oz. of cold brew (concentrate) is actually 64 oz. of coffee.
2. Don’t toss your grounds after one day!
Since your coffee grounds are slowly steeping, you can reuse those coffee grounds for multiple days. I keep the same grounds in the same nut milk bag in the same mason jar for up to a week, though I’ve found that after about four days is my sweet spot for a strong, robust cup of coffee. Around days five or six, it gets weaker.
Day 1: Make cold brew coffee.
Days 2-3: Enjoy some cold brew coffee and top off mason jar with more water. Do not remove the coffee grounds.
Day 4: Enjoy some cold brew coffee. Squeeze coffee out of coffee ground-filled nut milk bag into jar. Toss coffee grounds. Hand wash nut milk bag with dish soap and hot water; air dry. Do not add more water to the mason jar because adding it to your cup allows you to make a perfect, robust cup.
Days 5-7: Enjoy cold brew coffee. When you run out, repeat process so Day 7 becomes Day 1, etc.
Yes, it might look like a science experiment in your fridge for a few days, but trust me: the coffee is worth it.
The secret to cold brew coffee is that you can reuse the grounds for about four days and still have perfectly robust coffee.
Note: Some weeks are harder than others (AKA I drink more coffee per day), so I only make it to day 5 before I make another batch of cold brew coffee. Also, I’m the only one in my household that drinks coffee and I typically stick to one cup a day, so this process works for me. I usually make a new batch of coffee about every five or six days, but it still saves me time and money. (No more paper filters! Just reusable nut milk bags!) If you have multiple coffee drinkers in your household, consider a larger mason jar or multiple mason jars. I’m seriously considering a large beverage dispenser for my fridge so I don’t have to make the coffee as often.
Have you made cold brew coffee before? Are you considering it now? Let us know in the comments.
Discover more from Holy Homesteading
Subscribe to get the latest posts sent to your email.

