
For those of us less handy with a paint brush I’ve got this DIY for a cute planter.
From the dollar store, I bought:
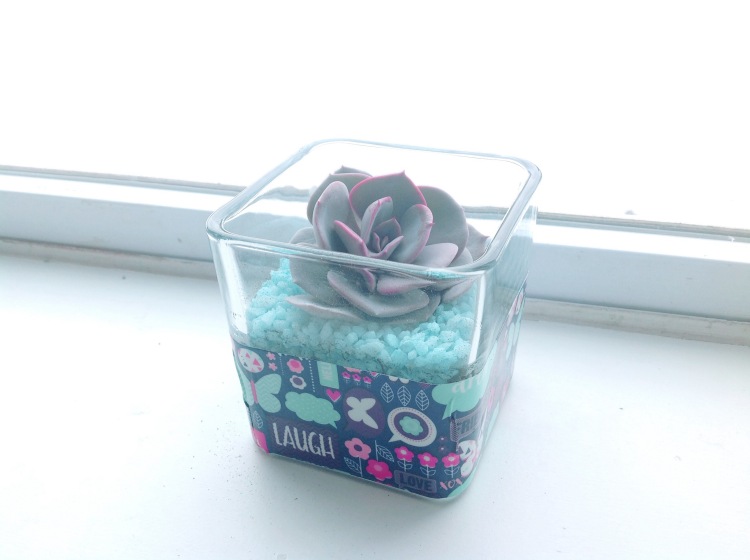
- Glass dish: square is best so the tape wraps well $1
- Duct Tape: the fancy pattern type $1
- Colored Rocks- matching the tape pattern $1
- Succulent- You can get the fake ones but I had one I needed to plant at home.
- Planting Dirt- Succulents like porous soil that drains well. I had some already.
- About 15 minutes
So I’m all in for $3.oo on this project. Now onto the fun!
I removed the price sticker from the bottom of the glass and opened up my tape. I wanted the tape to hide the dirt under the pretty rocks I’d be adding. So looping the tape around the glass was a slow process. I did make a small slice at the corners so I could fold the tape without loosing the pattern (due to the vase being slightly smaller at the bottom than the top).


After my tape was placed like I wanted I added dirt to just below the tape line and wetted it. Next I added a layer of blue rock about a 1/4″. If you are using a fake plant the depth of rock isn’t as important but I need to still plant a live succulent. Making a center hole I inserted the succulent stem through the rocks and into the dirt below.


Enjoy your new potted plant. Mine is a housewarming gift for a wonderful friend. You could also place this in a cubicle at work or make several and use as centerpieces at an event.
Happy Questing!


This is such a cute little idea! I love it! 😊💕
https://busybeeblogweb.wordpress.com
LikeLiked by 1 person
Thanks Tabi! Best part was how fast it was 😊💞 glad you liked it.
LikeLiked by 1 person
Thanks! I had fun making it 🙂
LikeLike
Great idea. Simple, quick, and cute.
LikeLiked by 1 person
Tonya! Thank you, it was fun and fast. Perfect if you want to make a bunch of them.
LikeLike